You spent good money on your driveway. Maybe it was a backyard patio, a walkway leading up to your front door, or a full commercial entrance. The pavers looked stunning the day they were laid crisp edges, tight joints, exactly what you envisioned.
Then winter hit. Then spring came. And now, a year or two later, you’re looking at sunken sections, cracked stones, and joints that are starting to shift in ways that make you nervous about walking across them.
Here’s the truth that a lot of homeowners don’t hear until it’s too late: the pavers themselves rarely fail. What fails is what’s underneath them.
The base material is the invisible foundation that determines whether your paver installation lasts five years or fifty. Get it right, and your pavers will outlive the house. Get it wrong, and you’re looking at costly repairs before you’ve even finished paying for the original job.
In this guide, we’re going to break down exactly what goes under pavers, how to properly prepare the base, and how deep that base needs to be depending on your specific project. Whether you’re a homeowner trying to understand what you’re paying for or someone who wants to know if a past install was done correctly, this one’s for you.
Why Pavers Fail From the Ground Up
Let’s start with what’s actually happening when pavers shift, crack, or sink.
Most people assume it’s a material quality issue – that they got cheap pavers, or maybe the contractor rushed the job. Sometimes that’s true. But in the vast majority of cases, the problem is underground, and it started before a single paver was ever placed.
The Most Common Paver Failures and What’s Actually Causing Them
• Sunken pavers after heavy rain – Water has nowhere to go because the base isn’t draining properly. It pools under the surface, softens the ground, and pavers drop.
• Cracking and movement after winter – In New York, freeze-thaw cycles are brutal. When water gets trapped in a poorly built base, it freezes, expands, and physically pushes pavers out of position.
• Uneven surfaces that create trip hazards – This is almost always a compaction issue. If the base layers weren’t properly compacted during installation, the ground settles unevenly over time.
• Pavers that look perfect at install but fall apart within a season or two – A quick, shallow base job might look fine on day one. But the moment it faces real-world stress – traffic, weather, soil movement – it starts to go.
Here’s a figure that should make you pause: industry professionals estimate that up to 90% of paver failures can be traced directly back to improper base preparation. Not the pavers. The base.
Think about what that means for your investment. You might be paying for premium concrete pavers, beautiful edge detailing, and a well-designed layout – and if the contractor cut corners underground, none of that matters.
What Happens When the Base Is Done Wrong – The Real Cost
We want to be direct with you here because we’ve seen what poor base work does to people’s properties – and it’s never cheap to fix.
- Water gets trapped and destroys from below. New York winters are brutal. When drainage is wrong, water sits under your pavers, freezes, expands, and physically breaks everything apart. By spring, you’re looking at popped joints and sunken stones.
- Soil shifts and takes your pavers with it. Brooklyn and Queens soil is unpredictable – old roots, utility work, decades of disturbance. Without a properly compacted base to distribute load, the ground moves. And whatever’s on top of it moves too.
- The repair costs more than doing it right the first time. Fixing a failed base means full excavation, removal, re-grading, and reinstallation. Not a patch job – a complete redo. Often pricier than the original install.
- Uneven pavers are a liability. One shifted stone, one bad trip – and in New York, that’s a legal conversation nobody wants to have.
A beautiful surface over a bad base isn’t a driveway. It’s a problem that hasn’t shown up yet.
What Actually Goes Under Pavers – Done Right
Alright, let’s get into the meat of it. Here’s exactly what a properly built paver base looks like, from the ground up.
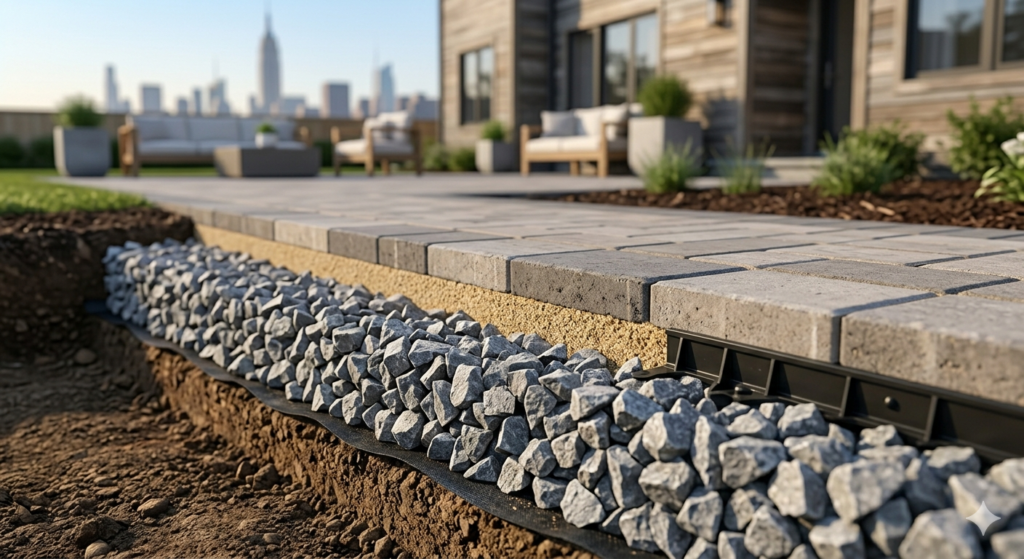
The Layers of a Proper Paver Installation
Think of a paver installation like a layered system, where each component has a specific job to do. Skip one layer or rush through it, and the whole system is compromised.
1. Native Soil / Subgrade – The Starting Point
Before anything goes down, the existing soil needs to be evaluated and prepared. The subgrade is the native earth that everything else sits on. It needs to be stable, free of organic material (roots, debris, topsoil), and properly compacted. Soft or organic-rich soil must be removed and replaced with stable fill. In New York, where soil conditions vary significantly from one neighborhood to the next, this step is not optional.
2. Crushed Stone / Gravel Base – The Load-Bearing Layer
This is the most important layer of the entire installation. Crushed angular stone – not rounded pea gravel, not sand, not dirt – is packed down in lifts to create a stable, load-distributing, water-draining foundation. The angular edges of crushed stone interlock when compacted, creating a base that resists movement and allows water to pass through and away from the surface.
3. Sand Bedding Layer – The Fine-Tuning Layer
On top of the compacted gravel base, a thin layer of coarse sand (typically about 1 inch) is screeded to create a perfectly level surface for the pavers to sit on. This layer allows for minor adjustments in height and alignment. It is NOT a structural layer – it’s just there to help set the pavers evenly. Making this layer too thick is one of the most common DIY mistakes.
4. The Pavers – The Visible Surface
Finally, the pavers themselves. By this point, if everything below has been done correctly, laying the pavers is almost the easy part. They’re set into the sand bed, tapped into place, and kept in alignment with edge restraints.
5. Polymeric Sand / Joint Sand – The Lock
Once the pavers are in place and compacted, the joints between them are filled with polymeric sand. This material hardens when wet, locking the pavers together, preventing movement, and stopping weeds and insects from getting in through the joints. It’s the finishing step that holds the whole surface together.
How Deep Should the Paver Base Be?
This is one of the most searched questions when it comes to paver installation – and for good reason. The depth of your gravel base directly impacts how much load it can handle and how well it performs over time.
Here’s a straightforward breakdown:
| Application | Gravel Base Depth | Sand Bedding Layer |
| Foot Traffic (Patio / Walkway) | 4 – 6 inches | 1 inch |
| Driveway (Passenger Cars) | 6 – 8 inches | 1 inch |
| Heavy Vehicle / Commercial | 8 – 12 inches | 1 inch |
A few important notes on depth:
• These are minimum depths. In areas with poor soil conditions or heavy clay, you may need to go deeper.
• In New York, the frost line depth is approximately 36 inches. This means water in the soil can freeze down to 3 feet during a hard winter. Proper base depth and drainage are especially critical here compared to warmer climates.
• The 1-inch sand layer is standard regardless of application. Do not make it thicker – a deeper sand bed actually destabilizes the installation.
How to Properly Prepare the Base for Pavers
Now let’s walk through what proper base preparation actually looks like step by step. This is the process that separates a 5-year installation from a 30-year one.
1. Excavate to the Correct Depth
Based on the table above, calculate your total excavation depth: gravel base + 1 inch sand + paver thickness. Mark the area, then excavate. Remove all topsoil and organic material – these materials are too soft and will compress and shift over time.
2. Compact the Native Soil
Before any gravel goes down, the exposed subgrade needs to be compacted using a plate compactor. This step is almost always skipped in DIY projects and budget contractor jobs – and it’s a major reason why bases fail. You cannot build a stable base on top of loose, uncompacted soil.
3. Add and Compact Gravel in Lifts
Don’t dump all your gravel in at once. Add it in 3 to 4 inch layers (called lifts), compacting thoroughly between each one. Each lift should be compacted until the plate compactor is no longer sinking into the material. This builds a truly dense, interlocked base.
4. Install Edge Restraints
Plastic or aluminum edge restraints are spiked into the compacted base along all edges of the installation area. These are absolutely critical – without them, the pavers at the edges will slowly spread outward over time, opening up the entire installation. This is another step that’s often skipped, and you can always tell when it has been.
5. Screed the Sand Bedding Layer
Using screed pipes and a straightedge, spread the coarse sand into a perfectly level 1-inch layer across the gravel base. This takes patience and a good eye for level. The precision of this step directly affects how flat and even your finished paver surface will be.
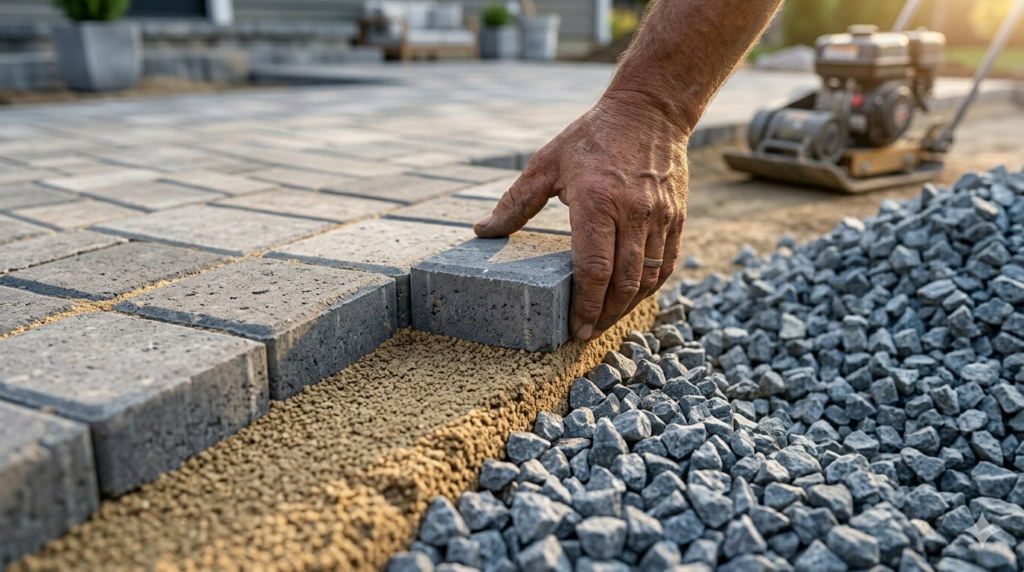
6. Lay Pavers, Compact, and Fill Joints
Pavers go in from a corner or straight edge, working outward. Once laid, they’re compacted into the sand with a plate compactor (with a protective pad so you don’t chip the surface). Then polymeric sand is swept into the joints, compacted again, and watered to activate the binding agent.
Common Mistakes to Avoid (Especially in DIY Projects)
• Using rounded gravel instead of crushed angular stone – Rounded stone doesn’t interlock and can shift under pressure.
• Skipping compaction between layers – Each lift needs to be compacted independently. Dumping everything in and compacting once is not the same thing.
• Making the sand layer too thick – Anything more than 1 inch of sand creates an unstable bed that allows pavers to rock and shift.
• Not accounting for drainage slope – The finished surface should have a slight grade (about 1/8 inch per foot) to direct water away from structures.
• Skipping edge restraints – No edge restraints means the pavers will slowly migrate outward over time, no matter how well the base was built.
Why NYC Homeowners Trust Kings Pavers to Get the Base Right
We’ve covered a lot of technical ground in this post – and honestly, that’s intentional. We want you to understand what proper paver base installation looks like, because an informed client is the best kind of client. When you know what to look for, you can tell the difference between a contractor who’s doing it right and one who’s cutting corners underground where you’ll never see it.
At KingsPavers, base preparation isn’t an afterthought – it’s the foundation of everything we do (literally). Here’s what that looks like in practice:
• We always excavate to the appropriate depth for your specific project – driveway, patio, walkway, or commercial entrance.
• We use only crushed angular stone for base material, never rounded gravel or substitute fills.
• Every lift is compacted with professional plate compactors, and we don’t move on until the base meets our standards.
• Edge restraints are always installed – we’ve never skipped them, and we never will.
• We account for New York’s frost line and drainage requirements on every single job, because we know what this climate does to paver installations that weren’t built for it.
We serve Brooklyn, Queens, Manhattan, Staten Island, and the Bronx – and across all five boroughs, the soil conditions, drainage challenges, and climate demands are different. Our crews know these neighborhoods. We’ve done the work here. We know what lasts.
Every project we complete is backed by our satisfaction guarantee, and we stand behind the workmanship from the ground up.
Don’t Let a Bad Base Ruin Your Investment
Here’s the bottom line: your pavers are only as good as what’s underneath them. The most beautiful, premium paver surface in the world will fail within a few years if the base wasn’t built correctly. And by the time you see the problem on the surface, the damage underground has already been done.
The good news is that doing it right isn’t complicated – it just requires the right materials, the right equipment, and the discipline to not skip steps. That’s exactly what we bring to every job.
If you’re planning a new paver installation, thinking about replacing a failing one, or just want someone to take a look at what’s going on with your existing driveway or patio – we’re here for that conversation.
FAQs
What goes under pavers?
A proper base includes compacted soil, 4–12 inches of crushed stone, and a 1-inch sand layer before placing pavers.
How deep should a paver base be?
For walkways, 4–6 inches of gravel is standard. Driveways require 6–8 inches or more depending on load.
Why is base preparation important for pavers?
Up to 90% of paver failures happen due to poor base preparation, leading to sinking, shifting, and cracks.
Can I install pavers directly on soil?
No. Soil alone is unstable and causes pavers to shift, sink, and fail quickly.
What is the best base material for pavers?
Crushed angular stone is the best option because it compacts well and allows proper drainage.